I'm linking to Wordless Wednesday.

The grass is green. It is good to be The Cow Queen.

date Wednesday, April 28, 2010

Family traditions run deep in many families. Traditions usually center around holidays and food. The same activities are attended and the same foods are prepared, or "it just isn't (insert holiday)."


Well, in some families the traditions center around the annual livestock show. Yes, LIVESTOCK! You know ... cows, pigs, sheep, goats, etc. In the royal family, livestock shows are a tradition on both sides of the family. The Queen grew up in 4-H activities. She had home economics and civics projects, but probably enjoyed the livestock projects most. Prince Charming grew up in 4-H and had livestock projects as well.


The past two days have been filled with activity at our local livestock show. This is the 65th year for our local show. Students came from surrounding counties and presented their animals for judging. Now, this particular show is a family tradition for the royal family because Prince Charming and his father showed here as children. Prince Charming's father was actually an exhibitor in the first show for this organization.


Now, it is the prince's turn to carry on the tradition. He is what they call a "Cloverbud." He is allowed to exhibit a small animal. He's too young to compete, but is allowed to participate for the experience. And what an experience!


At the tender age of 6, he is completing his second project year. Every day, he had to feed and water his goats.


He had to teach his goat to walk and lead with a halter.


As show day neared, he had to groom his goat and prepare it for it's debut.


He had to show it to it's best advantage and his best ability.


Now, the prince and Prince Charming arrived at the show approximately three hours before the Queen and the princess. This gave the prince plenty of time to work the crowd and make new friends. The Queen wasn't out of the car five minutes, when two pretty little girls came over to say hello to the prince and his goat. Not long after that, the freckled-face little girl at the stock trailer next door caught his attention. So, by the time the show got started, he may have been a bit tired and distracted from the morning's activities.

I'm linking to I'm Lovin' It, Friday Favorites, and Feature Yourself Friday.

The grass is green. It's good to be The Cow Queen.

date Friday, April 23, 2010


I'm linking to Wordless Wednesday. Click to see more photography.

The grass is green. It is good to be The Cow Queen.

date Wednesday, April 21, 2010

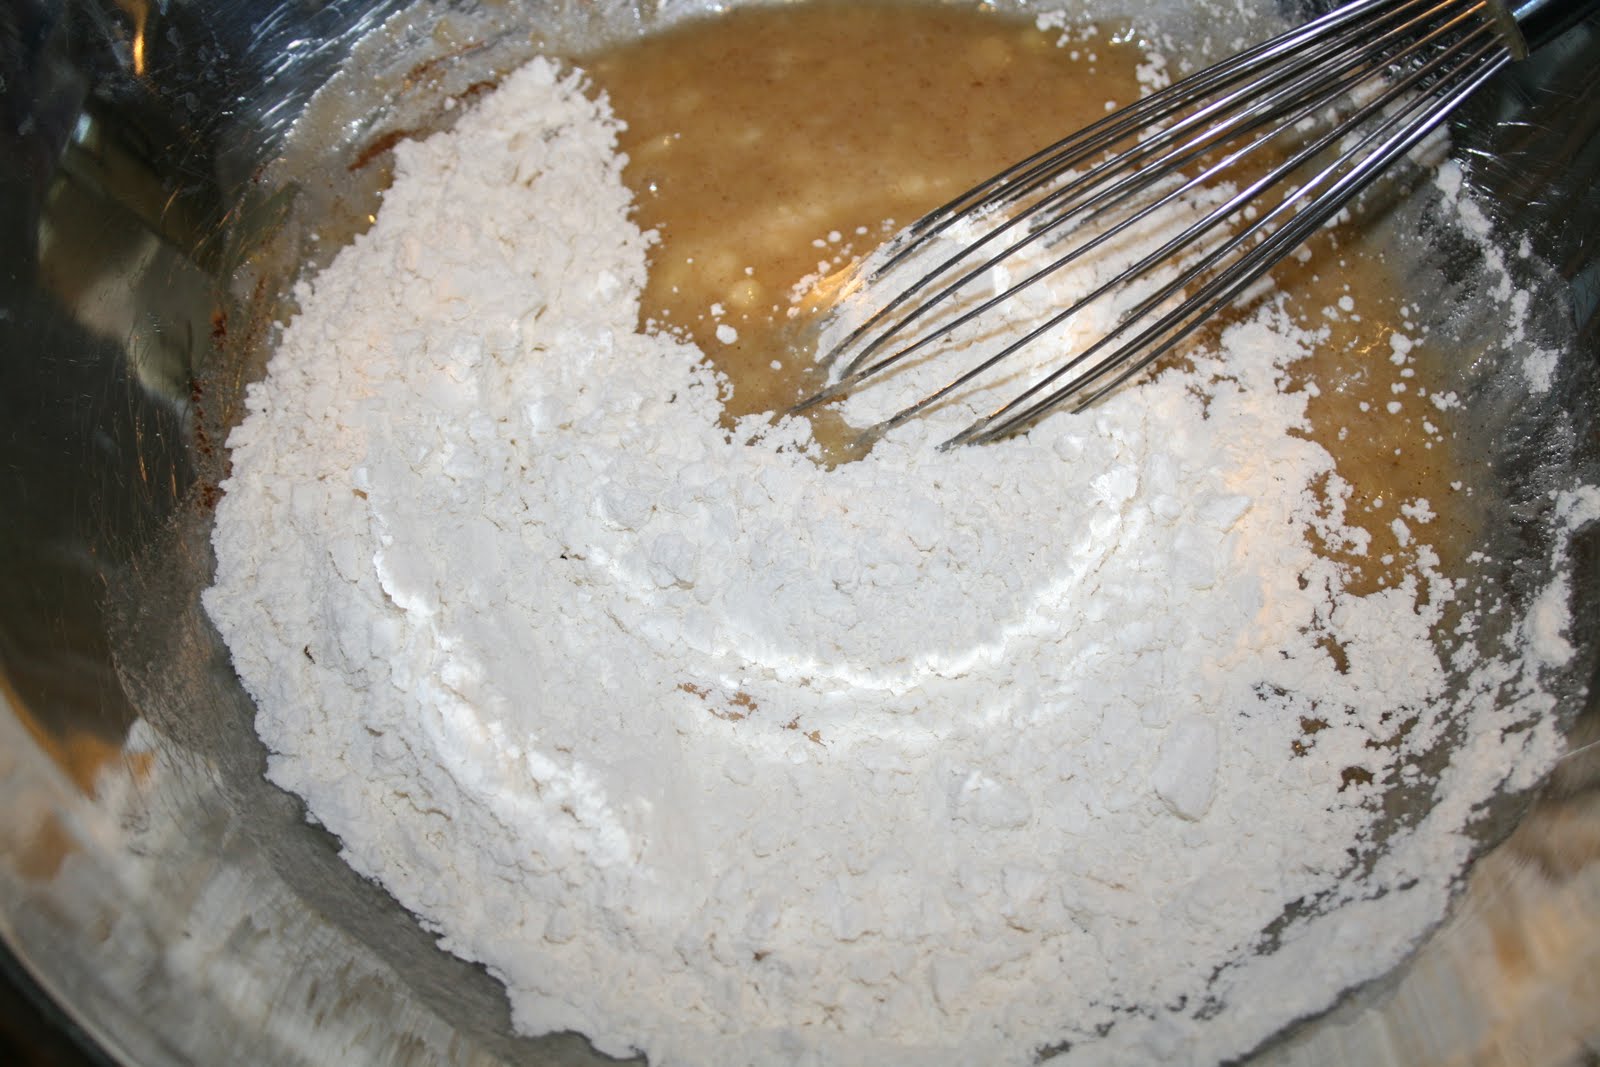
In the palace, bananas are usually found in one of many ways … too many, not enough, too green, too brown, and mush.


Well, one day last week, the Queen found that we were in the too-brown-headed-towards-mushy stage. So, she started making Mini Banana Muffins from a recipe she found at Tasty Kitchen. Then, she remembered that she didn’t have any eggs. So, she stopped after mixing the dry ingredients and started again the next day after a trip to the store. All was better!


Here's what you'll need:

flour, baking powder, baking soda, salt, bananas, sugar, egg, butter, cinnamon, and vanilla


Preheat oven to 350 degrees.


Coat muffin pans with non-stick spray. If you aren’t trying to take pictures as you do this, you might even get the spray in the cup hole!


Sift together the flour, baking powder, baking soda and salt. I find that a mesh strainer is sometimes easier to sift with than a regular sifter. It's a little messier too ... especially when little hands like to help with this part. Set aside.


In a large bowl, combine bananas, sugar, egg, melted butter, cinnamon, and vanilla.


Add the flour mixture, and beat until smooth. I followed the original author's recommendation and used the wisk to mix. It worked great.


Scoop into muffin cup Bake mini muffins for 13 to 15 minutes (bake larger muffins for 25 to 30 minutes). Muffins will spring back when lightly tapped and be slightly browned on top.


This is what my yield looked like … plentiful, but plain brown.


Since the Queen thinks everyone should have a crown, she grabbed some of that cream that comes in the aerosol can. You know the stuff. Don’t even try to deny it. She put a nice little crown on the brown little goodie. Yum!


Then the Queen remembered the homemade rum buttercream frosting in the royal refrigerator. Double Yum!


Now, the Queen’s original plan was to put some of these little treats into the freezer for another day. However, things don’t always go as planned. She consumed more than planned and little fingers that were just the right size for these little darlin’s had more than their share too.


That’s o.k. … we know how to make more. Here's how:


Mini Banana Muffins


1-½ cup All-purpose Flour
1 teaspoon Baking Powder
1 teaspoon Baking Soda
½ teaspoon Salt
3 whole Ripe Bananas, Mashed
¾ cups Sugar
1 whole Egg
⅓ cups Butter, Melted
½ teaspoons Cinnamon
½ teaspoons Vanilla


Preheat oven to 350 degrees.
Coat muffin pans with non-stick spray.
Sift together the flour, baking powder, baking soda and salt. Set aside.
In a large bowl, combine bananas, sugar, egg, melted butter, cinnamon, and vanilla. Add the flour mixture, and beat until smooth.
Scoop into muffin cups.
Bake mini muffins for 13 to 15 minutes (bake larger muffins for 25 to 30 minutes). Muffins will spring back when lightly tapped and be slightly browned on top.

I'm linking up to Tempt My Tummy Tuesday. AND ... since I put frosting on, I think that qualifies it as a cupcake. I'm linking to Cupcake Tuesday. Visit them to see other tempting treats.


The grass is green. It is good the be The Cow Queen.


date Tuesday, April 20, 2010

Before we get to the matter at hand. I just had to share some of my excitement with you. If you have been following me very long -- well, you couldn't have been for too long -- I've only been at this gig for about 7 weeks. So, if you've been reading some of my Friday posts, you'll see that I link up to other blogs that are hosting blog parties. Well, Rachelle at the Feature Yourself Friday party contacted me last night. She FEATURED ME on her blog today. O.K., so maybe it is not a FEATURE FEATURE, but she mentioned me and used one of my pictures. I'll take that for now! If you're curious, jump over there to see.

Now, on to what you came for ...
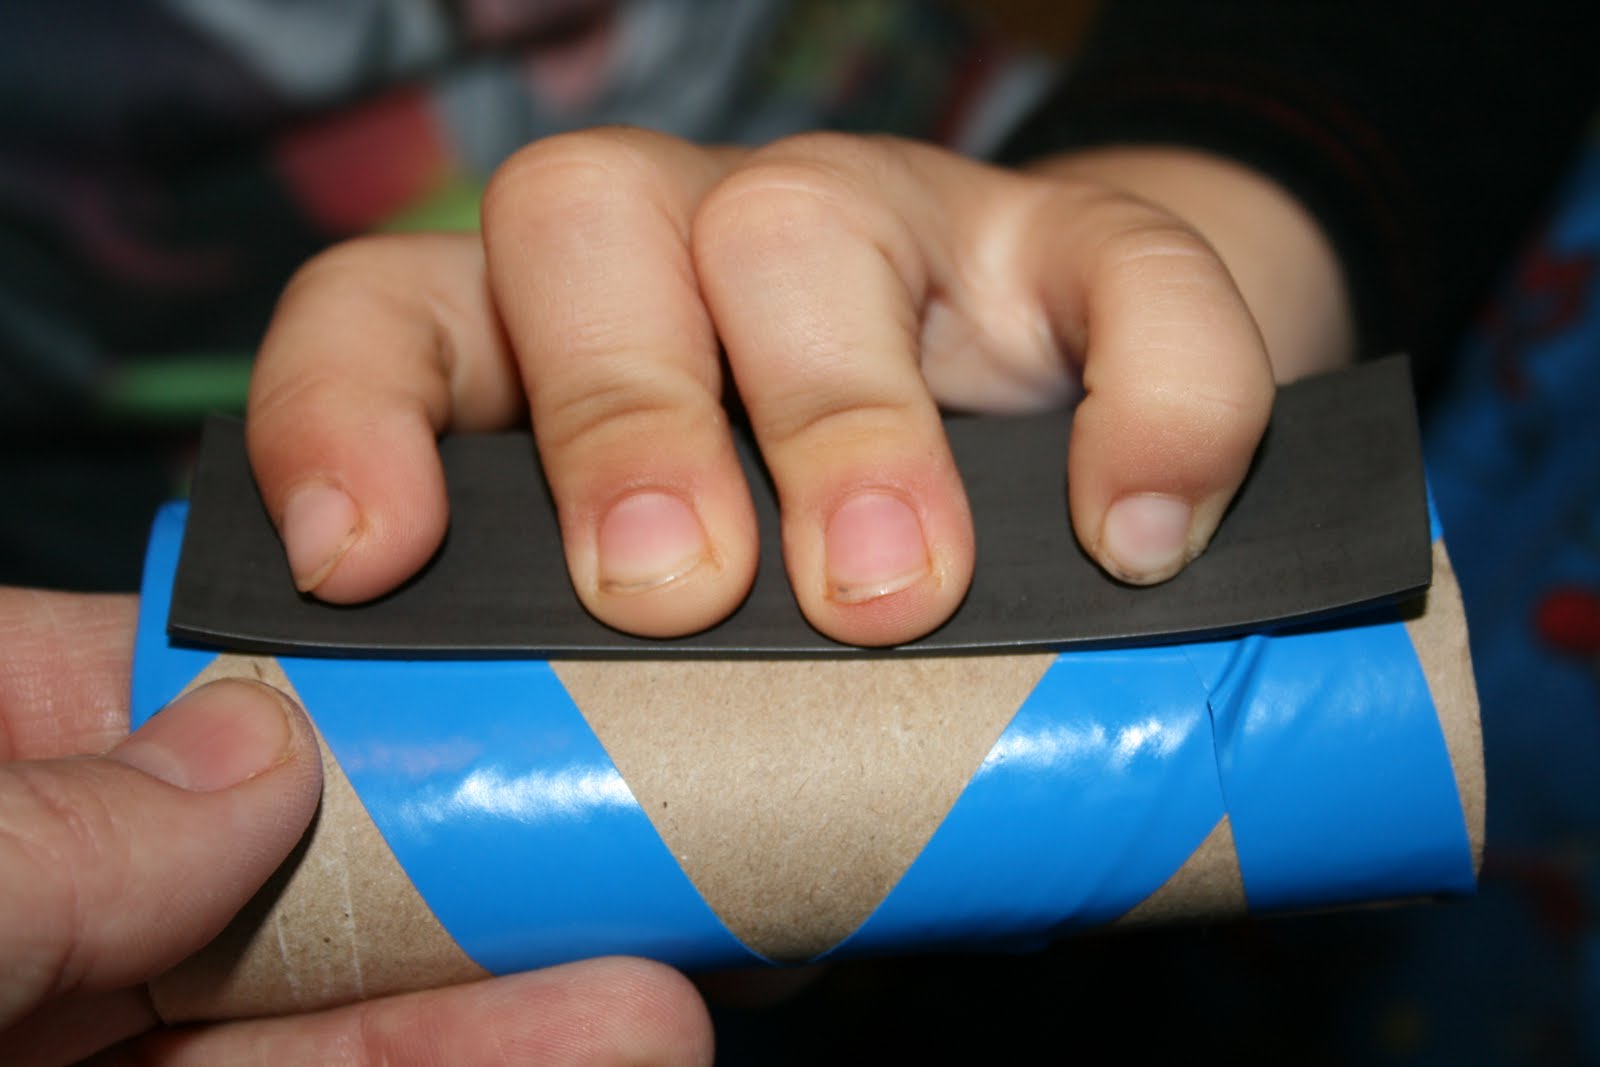
The prince has always loved marble runs. You know the little pieces of wood with grooves so the marble will roll down to the next piece and keep going until it reaches the bottom.

Now, being the tightwad that I am, I couldn't see shelling out the big bucks for the fancy schmancy store-bought ones AND ... I thought about all those little pieces scattered on the floor. Well, I held out and never bought one.


My patience (and stinginess) paid off when I found an idea for how to MAKE ONE very cheaply. Here is what you need:
toilet paper roller and/or paper towel rollers, magnet strips, and tape or other decorative materials (if you so choose)


The first thing to do is decorate your tubes. You can use colored tape, markers, stickers ... whatever cranks your tractor. If you are using the rolled magnets like I did, you might want to unroll them and let them relax before the next step.


Cut the magnet strips to the length of the tubes and peel the back off .


Smoosh (it's a technical term!) the sticky side of the magnet against tubes.

When you have all the tubes complete, place the magnetic edge against a metal object. (Our refrigerator was full, so we used the inside of the front door.) Arrange them so the marble can roll down from one tube to the next. We also had a tissue box at the bottom of the run to try to "catch" the marble.

I'm loving my cheap marble run so much that I am linking it to I'm Lovin' It, Feature Yourself Friday, and Friday Favorites. Click over to them to see what other people are doing.


The grass is green. It's good to be The Cow Queen.


date Friday, April 16, 2010


I'm linking to Wordless Wednesday. Hop over there for more photography.

date Wednesday, April 14, 2010

This past week, was another kind of break for us. Emily was on Spring Break and came to visit us. We ate, went shopping, ate some more, did more shopping, took a hike to the river, and loafed. Somewhere in all of that wonderfulness, the prince and I reviewed another study for The Old Schoolhouse Homeschool Crew.

Title: When I Grow Up. I Want To Be A Firefighter 
Author/Publisher: The Old Schoolhouse Magazine 
Target Audience: ages 4-10, but can be enjoyed by adults too 
Format: Download from The Old Schoolhouse Store (phone 1-888-718-HOME) 
Price: $8.95, with a money-back guarantee


This curriculum is part of the WannaBe Series from The Old Schoolhouse. In this 80-page download, the information is presented as a lecture and guest speaker platform. We really enjoyed learning such things as the history of firefighting, the bucket brigade, and why Dalmatian dogs are associated with firefighting. The hands-on activities were engaging and helped us to understand the concepts.


Subjects covered included:
  • Career exploration
  • History
  • Math
  • Science
  • Vocabulary
  • Art

  
Additional concepts included:
  • Creative Thinking
  • Physical Fitness
  • Problem Solving
  • Team Work

As part of the downloaded materials, there was a reading list, family fun activities, and links to other resources. We were able to find some of the suggested books at our library. Four of the five books we chose were read together, and one was able to be read alone … although it was cute enough that I stayed for it too.

The Queen’s Overall Assessment:
The unit is directed towards ages 4-10. Since the prince is 6 and the princess is 4, I base my assessment on those ages. I thought that this unit was really text-heavy for the younger ages. I really felt that the lectures and lessons would fit better with the upper ages. (I used the text as background information and presented it while doing the other activities.)

I would have liked to see more information on fire safety. There were two short games and a couple of library books. There were links to more fire safety information. When we visit the fire station for open house, we will get more information to build on what we learned. It also reminded us to review our fire safety plan.


This unit study is worth the price of $8.95.

  
Disclaimer: This was a review of my experience with the product described. I tried to give a complete and honest assessment without divulging too much information of a copyrighted product. In order to review the product, I received a free download version with no additional compensation. This in no way influenced my review of the product. The opinions expressed are my own and were not affected or reviewed by anyone prior to publishing.

date Sunday, April 11, 2010

O.K. The pictures may not be perfect, but they are getting better.

Have you ever missed the greatest picture because you had to get so close that the subject left or stopped doing whatever cute thing they were doing? Kids and critters are notorious for this.


Well, I got a new Canon Zoom Lens (70-300mm 1:4-5.6 IS USM) for my birthday last fall. It is amazing. I think the color is more intense and the images seem to be clearer. It has an Image Stabilizer system. That means, I can hold the heavy (relative term) thing in my hand and not have to use a tripod. I've even taken pictures while I'm walking and they come out with no shake! 

We took a hike to the river yesterday. I was able to take pictures of my fellow hikers without needing the tripod. And, I was able to "sneak" the pictures from a distance. Take a look:

They never even knew I was taking the pictures. The little one would have changed what she was doing, and the big one would have been making faces. It was so much easier to capture the moment from a distance.

Here are some other pictures from the farm ...
That would have been one dusty photo, if I had gotten close enough with my other lens!


Some mama cows are like some mama people. If you get too close to their babies, they will get you! This was just close enough!

If I had been any closer to these cows, I may have spooked them and missed the shot.

I'm really loving my new lens!

I'm linking up to I'm Lovin' It, Feature Yourself Friday, and Friday Favorites.  Hop on over to see what other people are loving.

Disclaimer: This is just a blog post about my lens. Canon has no idea who I am. If I dropped off the face of the planet, they would go about business as usual. I wrote this because I love my new lens and am having fun with it. I received no compensation from Canon or anyone else. 

date Friday, April 9, 2010


I'm linking up to Wordless Wednesday. Check them out for more pictures.

The grass is green. It's good to be The Cow Queen.

date Wednesday, April 7, 2010

‘Twas the day before Easter and all through the kingdom,

the children were snuggled to rest for a bit.

When all of a sudden, in the blink of an eye,

a light bulb went off and the Queen said, “Oh, My!”
In all of the prep and all of the clamor,

she forgot to make eggs for the prince and princess to color.

O.K. That doesn’t really rhyme, so I’ll stop now.

It was Saturday afternoon and we were about to leave for our church Easter egg hunt. I remembered that I forgot (I can do that you know!) to make eggs for the prince and princess to dye at home. I scrambled (get it?) to the kitchen to get the eggs boiled. Tidy Mom posted great directions on “boiling” eggs. So, I won’t do that. I will tell you what I do with the leftovers.

Here’s what you’ll need for ingredients:

Eggs, mayo, mustard, cider vinegar, and sweet pickle relish

Peel the eggs, by tapping them a little and gently squeezing them or rolling them gently on the counter. (Tip: If you use older eggs and peel them under running water, they peel easier. Start peeling from the large end and let the water get under the shell membrane.)

Place them on a paper towel to dry a little.


Cut each egg in half lengthwise.

Place the egg white on your serving dish and the yolks into a zipper bag. (Don't say anything about the green edge on the yolks. I got distracted and they boiled a little before I turned them down.)


Add all the other ingredients to the bag. Zip the bag and mix the ingredients by “smooshing” the bag. You want to make sure all the egg yolks are smooth and the relish is the only lumpy part.


Cut the tip off one corner of the bag.


Squeeze the bag to let the yolk mixture go into the egg whites. Don’t squeeze to make it stop. Don’t be too heavy handed. You can add more later, if you have extra. (You could also use a bowl to mix and a spoon or piping bag with a BIG tip to fill the whites. But then, you have more things to wash.)


I like to top the eggs with something colorful for serving. Here I used paprika. You could use a slice of olive, a sprig of parsley, or "whatever cranks your tractor." (I borrowed stole that line from Christy over at Southern Plate. I told her I was going to a long time ago. Check her out. She's a hoot.)


I fill the center of my plate with something colorful too. I usually put a bowl of sweet gherkins, olives, or this time… Easter Eggs! (Say anything about the heavy-handed paprika and I'll deny knowing you. They are going to disappear just like the other ones.)


Easy Deviled Eggs
6 boiled eggs
¼ cup mayo
1 tsp. prepared mustard
1 tsp. cider vinegar
Pickle relish, to taste
Peel and dry eggs. Add egg yolks, mayo, mustard, vinegar, and relish to a zip bag. Mix by mashing together. Snip the corner from the bag and pipe yolk mixture into the whites. Garnish as desired.

This is a great way to use the leftover colored eggs and eggs that cracked during boiling. The princess saw the cracked eggs and said, “Mama, they’re hatching. We have to keep them warm.” And she proceeded to do just that.


I'm linking this post to Mouthwatering Monday and Tempt My Tummy Tuesday. Hop on over to see other yummy recipes.

The grass is green. It’s good to be The Cow Queen.

date Monday, April 5, 2010

date Sunday, April 4, 2010

The Queen made cookies similar to these while growing up. We called them "Forgotten Cookies" because you put them in the oven and "Forgot" them overnight. A few years ago, I saw a slightly different version of the recipe and a lesson to go along with them. You can make them any night during Holy Week for Easter preparation.


What you'll need:

pecans (The prince has nut allergies, so we use mini chocolate chips), vinegar, egg whites, salt, sugar

Preheat the oven to 300 degrees F. DO IT NOW. Don't wait.


Place the nuts (or chips) in a zipper baggy and let children beat them with a wooden spoon. (If using nuts, you want them broken into small pieces. The mini chips are fine if left whole.) Explain that Jesus was arrested. He was beaten by Roman soldiers. (save these for later in the recipe)


Let each child smell the vinegar. Put the vinegar into the mixing bowl. Explain that when Jesus was thirsty on the cross, He was given vinegar to drink.


Add egg whites to vinegar. Eggs represent life. Explain that Jesus gave His life to give us life.


Sprinkle a little salt on each child's hand. Let them taste it and brush the rest into the bowl. Explain that this represents the salty tears shed by Jesus' followers.

Add the sugar. Explain that the sweetest part of the story is that Jesus died because He loves us.

Beat with a mixer on high speed for 12-15 minutes until stiff peaks form. Explain the color white represents the purity in God's eyes of those whose sins have been cleansed by Jesus.


Fold in the nuts (or chips). Drop by teaspoons onto waxed paper lined cookie sheet. Explain that each mound represents the rocky tomb where Jesus' body was laid.


Put the cookie sheet in the oven, close the door and TURN THE OVEN OFF.

Give each child a piece of tape and seal the oven door. Explain that Jesus' tomb was sealed.


You may have to tell the children that they may feel sad to leave the cookies in the oven overnight. Jesus' followers were sad when the tomb was sealed.

The next morning, open the oven and give each one a cookie. Take a bite. The cookies are hollow! On the first Easter, Jesus' followers were amazed to find the tomb open and empty.

Edited to add: This was a basic level of discussion for the prince and princess. You could add scripture study to the discussion for older children ... or even adults.

Resurrection Cookies
1 cup pecans or mini chocolate chips
1 tsp. vinegar
3 egg whites
a pinch of salt
1 cup sugar

Preheat oven to 300 degrees F. NOW!
Place nuts or chips into zipper bag and crush with wooden spoon.
Put 1 tsp. vinegar, 3 egg whites, pinch of salt and 1 cup sugar into a mixing bowl. Beat with mixer on high speed for 12-15 minutes until stiff peaks form. Fold in nuts or chips.
Drop by teaspoon onto wax paper-lined cookie sheet.
Put cookie sheets in oven and TURN OVEN OFF!
Leave in oven overnight.

I'm sharing this recipe on Tidy Mom I'm Lovin' It, Bake at 350, Strut Your Stuff, Foodie Friday, and Sweet Thursday. Stop by and see what other recipes and ideas you can find.

The grass is green. It is good to be The Cow Queen.

date Friday, April 2, 2010