Showing posts with label easy. Show all posts

Before we get to the matter at hand. I just had to share some of my excitement with you. If you have been following me very long -- well, you couldn't have been for too long -- I've only been at this gig for about 7 weeks. So, if you've been reading some of my Friday posts, you'll see that I link up to other blogs that are hosting blog parties. Well, Rachelle at the Feature Yourself Friday party contacted me last night. She FEATURED ME on her blog today. O.K., so maybe it is not a FEATURE FEATURE, but she mentioned me and used one of my pictures. I'll take that for now! If you're curious, jump over there to see.

Now, on to what you came for ...
The prince has always loved marble runs. You know the little pieces of wood with grooves so the marble will roll down to the next piece and keep going until it reaches the bottom.

Now, being the tightwad that I am, I couldn't see shelling out the big bucks for the fancy schmancy store-bought ones AND ... I thought about all those little pieces scattered on the floor. Well, I held out and never bought one.


My patience (and stinginess) paid off when I found an idea for how to MAKE ONE very cheaply. Here is what you need:
toilet paper roller and/or paper towel rollers, magnet strips, and tape or other decorative materials (if you so choose)


The first thing to do is decorate your tubes. You can use colored tape, markers, stickers ... whatever cranks your tractor. If you are using the rolled magnets like I did, you might want to unroll them and let them relax before the next step.


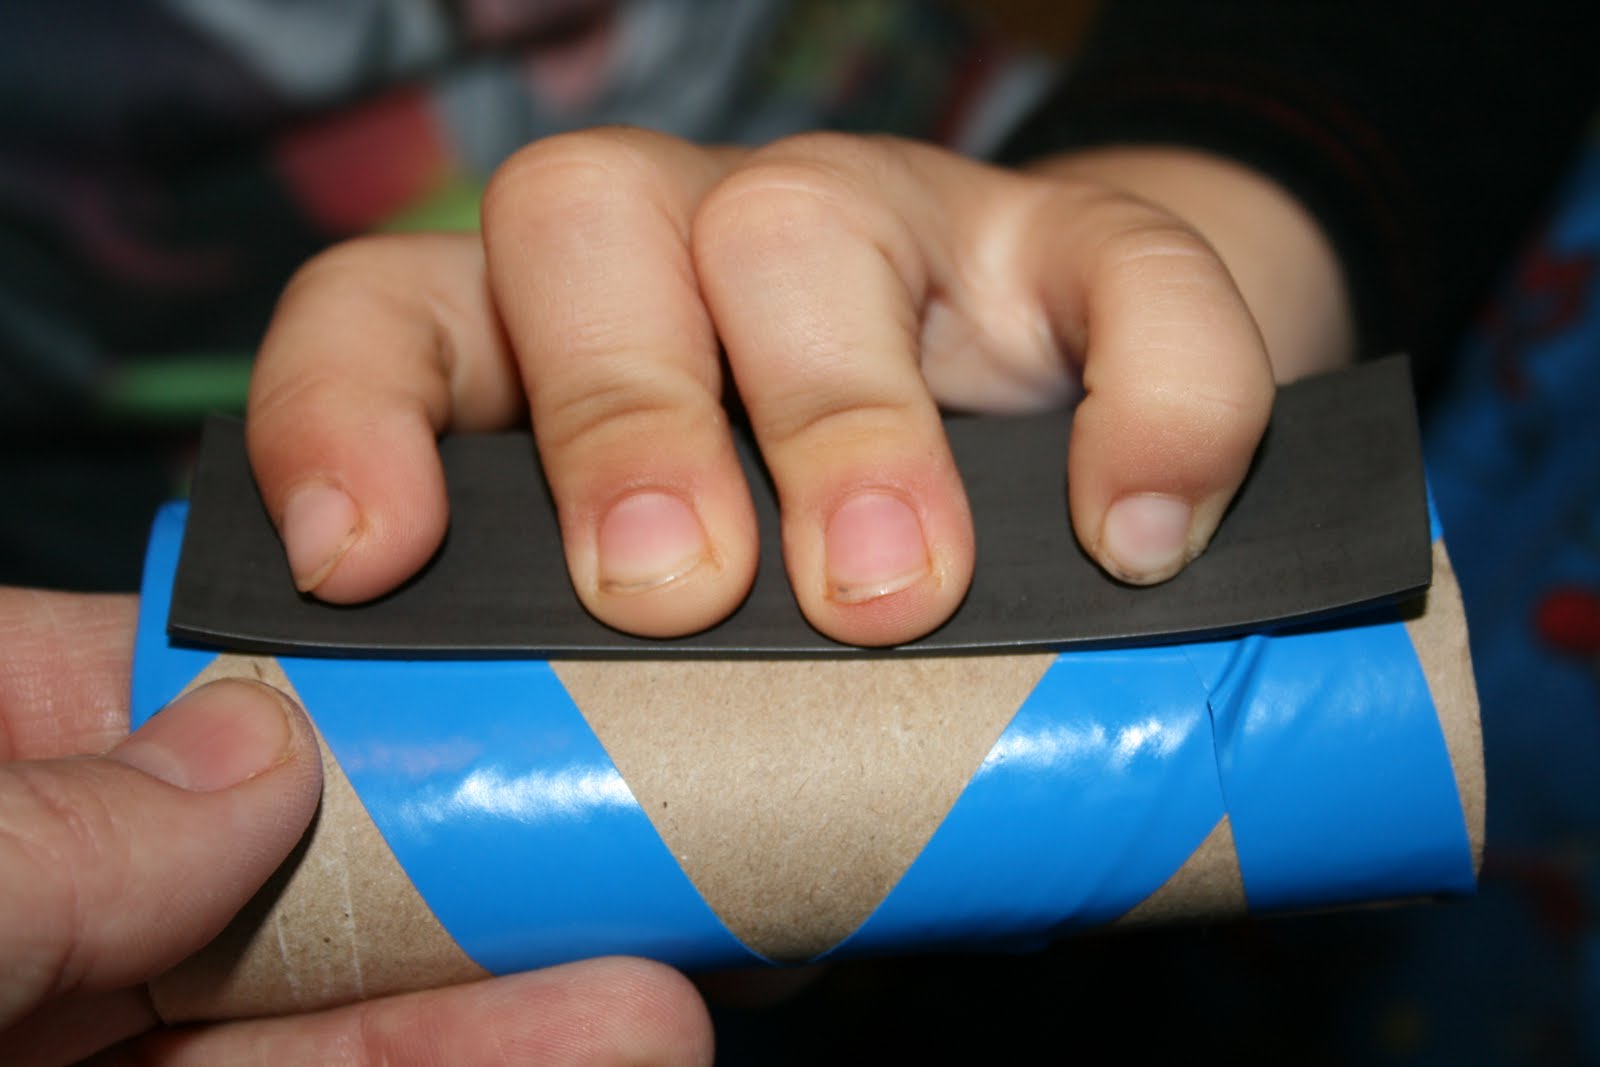
Cut the magnet strips to the length of the tubes and peel the back off .


Smoosh (it's a technical term!) the sticky side of the magnet against tubes.

When you have all the tubes complete, place the magnetic edge against a metal object. (Our refrigerator was full, so we used the inside of the front door.) Arrange them so the marble can roll down from one tube to the next. We also had a tissue box at the bottom of the run to try to "catch" the marble.

I'm loving my cheap marble run so much that I am linking it to I'm Lovin' It, Feature Yourself Friday, and Friday Favorites. Click over to them to see what other people are doing.


The grass is green. It's good to be The Cow Queen.


date Friday, April 16, 2010

This week’s Works for Me Wednesday post works for the Queen’s taste buds, but not the waistline. The Queen loves homemade bread. She loves to smell it cooking. She loves to put soft butter on it and devour it. Often the Queen doesn’t have time to spend all morning making that bread with all the kneading and rising going on. Then, she found Artisan Bread in 5 Minutes a Day by Jeff Hertzberg and Zoe Francois.


Now, the title is a little bit of a misnomer. The way it works is that you spend about 15 minutes mixing a batch of bread. You let it rise and store it in the refrigerator for a week or two. When you are ready for a loaf of bread, you take a portion of that dough, cloak it, let it rise, and bake it. The five minutes is the active time of working with it after the dough is mixed. It is super simple and super yummy. If the loaf of bread ever makes it from the oven all the way to the table without being “tested,” the Queen is surprised.


Spend the time to read the first 25 pages of the book to learn information that is critical to the recipes working. The book gives a basic dough recipe, some specialty loaves, and some variations of each.

date Wednesday, March 10, 2010

Everyone deserves to feel like a queen once in a while. So, I'm going to share this easy roast recipe that will get supper on the table and allow time for pampering yourself.

This has got to be the easiest way to make roast beef. It is a complete meal, requires no thawing, and 5 ingredients (O.K. ... Six if you count water, but I don't because I always have that on hand!)


Here is our cast of characters:


A frozen beef roast. I'm using 100% grass-fed beef because that is what we raise and sell. This happens to be a chuck roast, but any cut will do.

Veggies ... I'm using potato, carrots, and onions. Use the quantity to fit your family.

Seasoning ... anything you like. This one is a blend of garlic, season salt and pepper.

 
This is going to be fast, so try to keep up!


Spray the crockpot with non-stick spray. Put the roast in the crockpot ... frozen. I started doing this when I decided that my crockpot was cooking things too fast. By the end of the cooking time with a thawed roast, it was overdone, leaving a ring in the crockpot, and stinking up the house.
Sprinkle on some seasoning. Don't be too heavy-handed, you can always add more salt and pepper later.


I just chop the veggies into chunks. The potatoes get cut into halves and then each half gets cut into thirds depending on the size of the potato. 


The onions get cut in half. Then placed on the fresh-cut side, they are cut in half the long way and then into chunks.


That's right, baby carrots. Already peeled and "chopped." They are perfect for the queen in all of us.


Put the veggies on top of the roast and season again.


Pour about 1 cup of water on top of it all and set your timer to cook all day (8-10 hours). edited to indicate that it should be 8-10 hours on LOW


You will come home to a wonderful dinner ready for your queenly appetite. The veggies will be fork tender and the meat will just fall apart.

I would have a better picture of all this yummy goodness, but the royal taste testers got to it before the camera could!


date Friday, March 5, 2010